


")
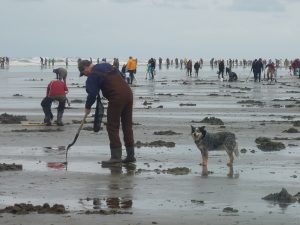
The Washington Coast is home to a family activity that will be remembered for years. Taking place during the fall, winter and sometimes spring months, the sandy shores along the Pacific Ocean become a destination for seafood lovers and coast enthusiasts, all hoping to come home with delectable fare and fun stories. The hearty Pacific Northwest residents who flock to the coast are in search of delicious mollusks, known as razor clams, found during low tides.
Clam digging, for those who haven’t been, is a fun, cheap and family friendly activity that will provide delicious meals and incredible memories. All you need to clam dig is a permit, an implement to dig the clams out of the sand and a container to put the clams in once you have found them. Sounds simple, right? Not so fast! Before heading out and attempting to dig razor clams, there are a handful of tips and things to know to ensure that you are clamming in a safe, healthy and legal manner.
Where and When to Go Clamming
To go razor clam digging, you need to go to one of the approved beaches during the scheduled times. Razor clam populations and the health of the clams fluctuate each year, so beaches that are open can rotate from season to season. Do not despair though, as there are numerous destinations open for clam digging each year.
From Kalaloch Beach in Olympic National Park down to the southern end of the Washington Coast along the mouth of the Columbia River, the beaches that are open make for excellent digging. Before you head out, make sure that the beach you are planning to go to is open for clamming on the scheduled days. Beaches can close to clamming. It is extremely important that you check the time of the upcoming tides. The lower the tide, the better clamming. Keep in mind that most clam digging dates are centered around the lower tides, but during the fall and winter digs, the low tides take place in the dark, when it is often rainy and cold. Spring tides allow for daylight clam digging with a potential for better weather. However, most serious clammers go during the fall and winter season.
A full list of open beaches and clamming dates can be found on the Department of Fish and Wildlife’s (WDFW) website, with the beach areas listed below. Always make sure to follow all rules and regulations about clam digging and driving on the beach.
- The Long Beach region starts at the mouth of the Columbia River and heads north, all the way to the mouth of the Willapa Bay.
- The Twin Harbors region extends from Willapa Bay north to the south jetty at the mouth of Grays Harbor, found in Westport, WA.
- The Copalis Beach region stretches from the north jetty at the mouth of Grays Harbor in Ocean Shores, WA all the way north to the Copalis River.
- The Mocrocks region sits between the Copalis River as the south boundary and runs north until it reaches the boundary of the Quinault Indian Reservation.
- The Kalaloch region runs from the South Beach campground, all the way north to Olympic National Park’s Beach Trail 3. Keep in mind that this beach is often closed to harvest.

What to Bring
Permit
It is pretty simple. Without a permit, you can’t legally go clam digging. Diggers who are 15 years old or older are required to have a 2017-18 license to harvest razor clams on any beach. The nice thing about this is that you can choose a license based on how long you plan on going clamming this season, with options ranging from a three-day razor clam license to an annual combination clamming and fishing license. The licenses can be purchased on WDFW’s website or from license vendors found all around the state. Once you have your license, there are rules to clam digging that you must follow. Each clam digger is allowed to take up to 15 razor clams per day. You are legally required to keep the FIRST 15 razor clams you dig, no matter the size or condition you find them. Each clammer also must keep their clams in their own container. Combining containers is a violation of the rules and regulations and you may get ticketed.
Clamming Tools
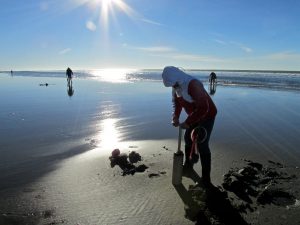
Digging razor clams is a skill and if you are just starting out, it might be a bit difficult. To dig a clam out of the sand, there are two options for retrieving it. Your choices are between using a shovel or a clam “gun.” Advanced clam diggers can be seen using shovels, but they typically have been clam digging for years, as shovels require patience and practice before you can use them quickly and effectively. Most beginners use a clam gun, which is a metal or PVC tube that you twist into the ground and pull out the sand all around the clam. Many will agree that this is the easiest and simplest method of getting your limit of razor clams. The WDFW website has tips and videos on how to use both tools, as well as other great clamming advice. Remember, that with each clam you successfully dig out of the sand, it is required to be placed in your personal container for clams.
Warm clothes
Being properly outfitted for clam digging is considered to be nearly as important as a permit and the right tool. During the fall and winter clam digging season, the best tides are during the cold and wet nights along the coast. To be smart, safe, warm and dry, you will need to layer your clothes, making sure to include a sturdy pair of rubber boots, good rain pants, a warm hat and a trusty rain jacket. You will also need to bring a lantern or headlamp. By layering your gear, you will be ready to take off some layers in case the weather gets nicer. Always assume it will be wet and cold, though. Do not head out unprepared.
How to Find a Clam
The key to any successful clam digging adventure is to start digging about an hour or so before low tide. Starting early allows you to follow the tide as it goes out, giving better views of clam activity. But, what does clam activity look like? Ideal conditions for clamming are when the clams are “necking.” This is when the clams stick their necks out of the sand, but keep in mind that this is pretty rare to see for first timers.
Chances are, if you are out clamming, you will see one of three marks in the sand that are from clams. One is a dimple, which is a depression in the sand. Or you may see a doughnut, which has a small hole and raised sides. Lastly is a keyhole, which usually occurs in drier sand and looks like an hourglass or hole. A general rule of thumb is that the larger sized holes indicate larger clams, but this is not always 100 percent the case.
Once you see the signs of a razor clam, you’ll need to be quick, as razor clams can burrow at a fast pace in soft, watery sand. Once you successfully dig your clam, be careful as you grab it – their shells are the reason they are called razor clams. After carefully placing it in your container, continue until you have your limit of 15 clams per person, per day.
Sponsored


